Popular DIY Squeaky Floor Fixes You Should Avoid
The internet is filled with “how to” DIY solutions for silencing squeaky floors. Here we will discuss each of the popular ideas, and explain why they DON’T WORK!
Is there anything worse than a squeaky floor in the middle of the night? I’ve had many middle of the night, 3 a.m. excursions for a sip of water turn into a tuneless symphony of noise from my floor. If you’ve also experienced the annoyance of a creaking floor with a sleeping family, you likely tried to find some solutions. A quick Google search reveals a list of DIY methods. Great!
Here’s the unfortunate truth: These DIY “tips” don’t work as advertised, and often can ruin your floor! There’s nothing more frustrating than wasting time and money on fruitless DIY attempts that, at best, will give temporary relief and at worst, destroy your floor. The least we can do is give you a run-down on why the top 7 DIY tips and tricks found online are ill-advised by our squeaky floor experts at Squeak Knights.
(Next Read: 7 Tips to Prevent Squeaky Floors)
1. Wedge Shims Between Joist and Subfloor
Wedging a shim between joist and subfloor is typical advice for creak elimination. The idea is to push a thin wedge of wood into the gap in-between your joist and subfloor in areas that are causing noise when stepped on. With a shim inserted into the gap, the plan is for the shims to eliminate the void and stop the movement.
Simple right? In practice, not so much!
Firstly, this advice is only applicable when you have open access to the floor structure from below. If you have a finished basement or the squeak is on an upper floor then you are out of luck. Without a significant renovation (with all the costs and disruptions that come with it) you are not going to be able to get a shim into the necessary places.
More importantly, you run a real risk of making the problem worse. By wedging shims into a gap in the floor structure with just a little too much pressure, you can end up pushing the floor up along with its fasteners, loosening the floor all-around the wedges.
Congratulations, that squeak is now spread 6″ to 12″ around the original spot, and you have a new noise that wasn’t there before. The lesson here is that unless you are a floor expert, you run the real risk of making the problem worse.
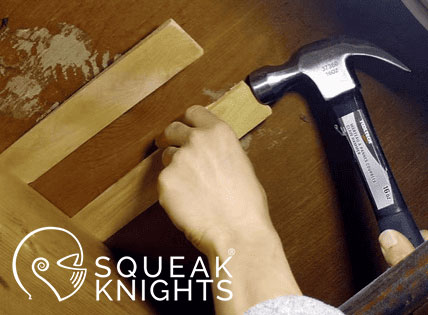
2. Adding Screws, Nails or Staples
Ah, the old “if it makes noise, keep hammering it until it stops” advice. You will often hear that the simplest and most cost-effective solution to your squeaky floor is to tighten the boards with screws, nails or even staples. They originally fastened it, so why can’t it be refastened with them?
We might only be squeak repair experts and not interior designers, but we don’t care for the look of a floor riddled with screw heads and shiny nail heads. The reality is that your effort to make the floor noiseless will make the floor quite ugly.
Even if you can live with your new metal riddled floor, you still aren’t fixing the problem and might further aggravate your floor. The noise from a squeaky floorboard is often coming from the board compressing up and down a nail, screw or staple. Soon enough, the board you’ve refastened will lift, and the new nails or screws will be the genesis of a reborn squeak. You’ll be surprised how quick fasteners used on problem areas of a floor start making noise. To actually fix squeaky floors, you need to find a solution that is not more nails, screws and staples.
3. Squeeeeek No More – Kit
“So, screws don’t work,” you say in defiance, “but what about specially designed screws that are in the squeak repair kits?” I am happy you brought that up. If you thought refastening your squeaky floors with regular nails, screws and staples was as bad as it got, you’re in for a surprise.
The Squeeeeek No More kit, and products like it, contain specially designed screws that are built to have tear-off heads so you won’t notice them on the floor. They are applied through carpet to fasten subfloors to joists.
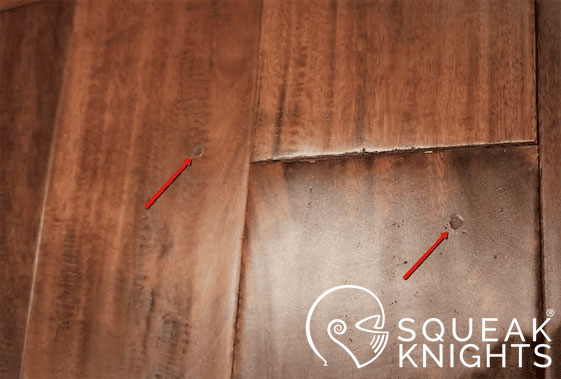
Our client tried the Squeek-No-More kit before calling us. Here’s the result; nasty damage to the beautiful floor and a proud sharp edge.
Here’s the problem: the head of a screw is a vitally important part of the screw. When you rip off the screw head, you remove the part meant to do the holding! The remaining screw threads can’t last very long, if at all. Even the theory is flawed: squeaks are formed from a variety of issues in the floor structure, the subfloor becoming loose from the joist is only one of many problems that may be causing the noise.
The result? We’ve done dozens of repairs after a client tried the kit and realized after a few short days that it didn’t work. Home Depot Canada has even pulled the product from their shelves because of customer complaints. You can probably skip ahead to the next debunked tip, because if they don’t work, then there is no reason to waste money and time with it.
If you need another reason, then consider the integrity of your floor. These Squeak No More kits may look good on carpet, but on a hardwood floor, it leaves a big hole that you will see. And even on carpet, if you can’t see when you break off the head of a screw, you could accidentally leave a bit sticking out and end up stepping on it. Ouch!

4. Squeak-Ender Products
Squeak-Ender is a website that offers a variety of products (mostly brackets) that aim to fasten and support the joist to subfloor junction.
You can probably guess one problem with the Squeak-Ender line of products, if you read the debunking of the Squeak No More kits: it only solves one type of squeak. The screws from the Squeak-Ender doesn’t go through to the boards above the subfloor, so it doesn’t help with any squeaks emanating from above the subfloor levels. Not to mention a dozen other squeak causes it doesn’t address.
You also need to have access from below, so any finished basements or second-floor squeaks are unable to be fixed with this method. Besides which, over time the brackets may loosen and contribute to a squeak themselves! So, if you plan to cover up the area that you fastened (with a finished ceiling) these products may only add to your squeaks in the future.
If you’ve ever tried one of the products, you won’t be surprised to hear that they are complicated and relatively sophisticated to install correctly. You need to have precise knowledge of where to install the bracket and how to do it in a way that won’t make the sound worse. “But how could I make it worse,” you ask? If you end up over-tightening the bracket, it may spring up and raise other nearby areas of the floorboard and create gaps that form new, adjacent squeaks. The worst part is that often the new squeaks reveal themselves only a while after your initial repair, making for a nasty surprise!
5. Talcum / Baby Powder (or lubricant)
Well if more screws, nails, brackets and other products are only going to contribute to the squeak, might as well think outside the box and look for methods that won’t end up making noise.
It’s a reasonable thought process, and talcum or baby powder can be used to soften the noise of squeaks temporarily. If there is powder or lubricant inside the gaps of the floor, the friction causing noise will subside and you’ll have less squeaks. Right?
In practice, however, the solution rarely works, and when it does, it is incredibly temporary.
Considering that the squeak will likely return in a couple days, I wouldn’t be excited about my new part-time job of continually inserting baby powder into my floors. Besides it is common for powder to resurface from the floor after the gap compresses, leaving with you squeaky and messy floors. Yuck!
And again, if the squeak is coming from deeper components inside the floor, you’re out of luck with this method.
6. Nail a Board Along a Warped Joist
Nailing a board along a warped joist is some good advice and will help reduce the creaking of your floorboards. However, its dependent on having open access to the beam from underneath (which isn’t available in homes with finished basements or squeaky floors on an upper level). There may also be some contributing factors that are causing the noisy floors; a warped joist is just one potential cause of squeaky floors. Above it, the hardwood itself may squeak. There may be a hidden nail rubbing, or a cross brace moving. In other words, you’d be lucky if this solution removes your particular squeak.
7. Finishing Nails into Hardwood
You’ll find recommendations to use tiny finishing nails to tighten the floor down, with a minimal visual effect. Finishing nails are indeed tiny, and there lies their fault. The smooth, narrow and practically headless nails have almost no strength to stay put. Once they loosen from normal use, these nails will now add to the squeaking sounds.
In our experience, we have seen floors utterly perforated with nails, especially in century homes, that squeak like no other. You are just adding ugly nails that will loosen and rust, especially in high traffic areas. Save your floor… don’t nail it.
If you want to silence your squeaky floors, without risking their integrity and appearance, bring in the experts from Squeak Knights. We have diagnosed and permanently silenced hundreds of floors in the Greater Toronto Area. Instead of using traditional methods, we developed special diagnostic methods, repair tools, processes and techniques to strengthen the structure of your floor, using adhesives; effectively silencing your floor at the root of the cause. Our best tip? Give us a call and book an assessment with the professionals.
If you have other tips and tricks that you would like to get a second opinion on, let us know! We would even go as far as testing them out and letting you know our result!
Written by Robb Fournier and the Squeak Knights Team.
Our passion is to help you feel more comfortable in your own home, so don’t be shy to contact us with any questions you may have: